Pages

Showing posts with label Fun. Show all posts

Friday, July 13, 2012

Picnic Series- Installation 5

Post By: Guest Blogger, Kiersten Washle

A Piece-It-Together Picnic!


When you want to picnic but you don't want to go out and get all the necessary food, it is time for a piece-it-together picnic. The idea is similar to that of a church luncheon; everyone brings a dish they enjoy or have on hand. All you have to do is call a few friends, just decide a time and place. Then you all show up with one edible item. By the time you and your group of friends are assembled, you should have quite the nice little array of food. Now enjoy the food, fun, and fellowship as you all dine out amongst nature's beauty! 


Thursday, July 12, 2012

DIY Paper Pockets

Post By: Guest Blogger, Kiersten Washle

Today's post is going to be an instructional post, giving step by step instructions for how to make paper pockets! Simple to make, these pockets can be used for many different purposes. At the bottom there are pictures of what we did with our pockets and extra suggestions for how to use these little cuties! Without further ado, let's get started!

Step 1: Gather supplies!
You will need:

  • Paper
  • Scissors
  • Something Round 
  • A sewing machine (or a needle and thread)
  • Candy 
  • Markers or Stickers for decorating! 


Step 2: Take your round object and trace a circle onto your paper.
We used the bottom of a candle stick.


Step 3: Once you have one circle, cut it out and use it as a stencil. We took out first paper circle and traced as many circles as we could on our scrap piece of craft paper. You can use any paper you like, but remember, in an effort to be eco-friendly always try and maximize the space on one sheet of paper.
This was our piece of paper, we started tracing...

...and ended up with this. There are enough circles
here to make thirteen paper pockets.


Step 4: Cut all your circles out!

Step 5: Grab your sewing machine and get ready to sew paper. To do this, take two of your circles and lay them on top of each other. Place them how you would normally place a piece of fabric. (Pictured below)
This is how your paper circles should look before you sew.

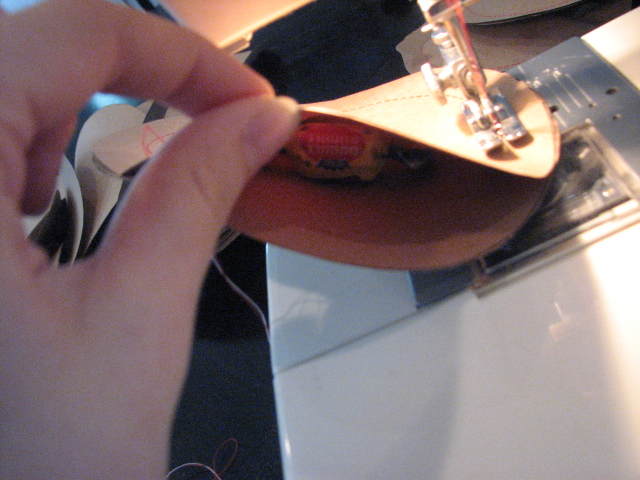
Hold your paper circles and begin to sew.
Sew halfway around the circle and then stop. 

Grab some candy; this is what we stuffed into our paper pockets.

Use your finger to push in each piece of candy. Don't put too
much inside or you will have a difficult time trying to close it up.
Your candy should be inside and pushed back as far as possible.
This is what the stuffed pocket will look like. Now it is time
to finish sewing the pocket closed. To do this, pinch the paper
together and continue to sew the perimeter.
Once you have sewn around the entire circle cut the strings.
You need to pull all the loose strings to the back of your pocket
and tie a knot. This keeps the stitching from unraveling.
 Cut off the extra string and...
...TADAHH! The completely sewn circle will look like this! 

Step 6: Time to decorate! This is where you can get as creative as you want. You can use markers, stamps, pens, stickers, buttons, tissue paper, or paint! It is up to you!
Below are some of the designs we made using just a few pens.
These would make really cute party favors.
We put a bunch of them in a basket by the door so our guests
could take one as they left, to add excitement we wrote the following little poem:
"Even thought it is time to go,
We just wanted you to know:
Having you was such a treat!
Please take a little something sweet!"

We also thought these little pockets would be a really cute something
to receive in the mail. You could use them as a thank-you card,
a thinking-of-you card, a get well soon card, or just to say hello!

Back to the mail idea, you could reinvent your traditional Christmas
card. Try replacing it with a paper pocket filled with candy canes!
If you want to stick with a plain Christmas card, that doesn't
mean you couldn't break these babies out at another holiday! ;)

These pockets could be used to make someone's day..stash a few in
your desk or purse and when you see someone in need
of a pick-me-up, casually pass them a pocket with an uplifting message!

We really like the idea of making someone's day so really, get
creative! You can say any number of things; say something
sweet or just order someone to "HAVE A GREAT DAY!!"


If ordering someone to have a nice day doesn't float your boat,
try a gentler method- crack a few jokes!
On an entirely different note, try switching out the candy for
a few flower seeds and some soil. If you use biodegradable paper
(most paper is) then you can make a package that can be buried!
That is right, with seeds and soil, this paper pocket is ready to be planted!
Dig a hole and toss it in, later on you can enjoy a few pretty flowers.


 You can use scrap fabric as well as paper, and the decoration possibilities are just about endless. You can put just about anything inside as well.With these pockets, the sky is the limit! 

Wednesday, July 11, 2012

Picnic Series- Installation 4

Post By: Guest Blogger, Kiersten Washle


Meet the Bento Box-
This is the Japanese version of a lunch box. Bento roughly translated means "convenience", and what is more perfect for a picnic than something convenient? Typically Bento Boxes are compartmentalized so that you have several small portions of different types of food. In many Japanese households the homemaker spends time each morning to prepare their spouse  and children special Bento lunches.

How does this relate to picnics? Well, Bento boxes were too neat not to mention. Instead of the mason jar mentioned in the first installation, try mixing it up and using a Bento Box. You can use the box, but still stick to American cuisine, or you can use the Box to get inspired. There are plenty of ways to make picnic food in a Bento Box. This is another neat little way to spice up a picnic. If you are feeling especially creative you can try creating little pictures with your food! (Whoever said it is impolite to play with your food was right but, hey! This is a picnic! Have at it!) We are going to share our favorite Japanese inspired picnic item-Sandwich Sushi, followed by some really neat pictures of Bento Boxes whose makers were clearly inspired!


Sandwich Sushi Recipe:
Chicken, Cheese, & Carrot on Wheat


Ingredients:
2 Slices Wheat Bread
Thinly Sliced Chicken Lunch Meat
A Few Carrots, Grated
A Pinch of Shredded Cheese

A knife, Cutting board, and Rolling Pin are also helpful to produce optimal results.

Directions:
1. Take your two slices of bread and cut off the crust (It doesn't flatten out nicely.) Once the crust is cut the lay one end of one of the slices on top of the other end, they should over lap only about 1/2 and inch. With the bread touching, use the rolling pin to roll each piece really flat. The part that was touching should have stuck together leaving you with one long piece of bread.
2. Now layer in your lunch meat and carrots, when you lay them on the bread leave a 1/2 inch border around the perimeter. This will allow the bread to stick when you roll it up.
3. Take your bread, chicken, and carrots and roll it into a cylinder, you should have a long thin roll, pinch the bread together at the seam.
4. Now cut the roll into thirds, you are done! A Japanese cuisine inspired sandwich!

Here are some Bento Boxes for inspiration, these would not only spice up a picnic but also entertain the children and the child in us all!


Monday, July 9, 2012

Picnic Series- Installation 3

Post By: Guest Blogger, Kiersten Washle

At the farm we believe that you are what you eat, so why not enjoy a healthy treat? This is the third installation of the picnic series and the topic for today is finger food. Finger food is one of the greatest parts of picnicking, no silverware, no mess, no worries. As great as finger food is, there is one problem: often times people think their only finger food options are of the packaged and processed variety. Today we want to showcase some options that are both simple, bite-sized, and healthy.

Recipe 1: Grape Caterpillars
 Ingredients:

  • A Package of Grapes
  • Cooking Icing (Betty Crocker brand comes with a easy to squeeze package) 
  • A few mini Chocolate Chips
  • Skewers

 Directions:
1. Wash your grapes. Push about ten grapes onto each skewer.
2. Take your icing and make two circles (as large as you can make them) on the first grape in the line.
3. With 2 mini chocolate chips, make eyes by placing one chip in the center of each icing circle.


Recipe 2: Stuffed Cherry Tomato Poppers
 Ingredients: 

  • Cherry Tomatoes
  • Prepare Salad of Your Choosing
  • Mellon Baller (for scooping out the seeds and pulp)


 Directions:
1. Slice top off of cherry tomato. Scoop out the inside of the cherry tomato using the melon baller. Lightly salt inside an turn upside down on paper towel to drain excess liquid.
2.Stuff with your favorite prepared salad and there you have it! Below are a few prepared item we suggest:

  • Wild rice salad
  • Quinoa
  • Tuna Salad 
  • Orzo Salad


Recipe 3: Fruit in a Lemon 
 Ingredients:

  • 3 Lemons
  • 1 Apple
  • Grapes
  • 1 Orange, peeled
  • A knife
  • A grapefruit knife would be helpful to hollow out the lemon, but as long as it gets hollowed out, you can use whatever works. 

 Directions:
1. Wash your lemon, cut the top off and set aside. (We are going for a container here, so when you cut your lemon do not half it.) Hollow out the lemon. Repeat with the other two lemons.
     ~We won't be using the insides but feel free to use them for a nice refreshing glass of homemade lemonade.
2. Chop a washed apple into small bite sized chunks. Set aside.
3. Wash your grapes and pull them off the stem, set aside.
4. Separate your peeled orange into slices. Set aside.
5. Mix all the fruit together and divide evenly into the lemons.
6. Replace the top of each lemon and use a piece of ribbon, twine, or a rubber band to hold it tight.

Now you have a nice fruit cup! The lemon's natural acidity will keep the fruit fresh and the thick skin will keep it a little cooler than plastic ware.

That's all for today folks! Stay tuned for the next installation of the summer picnic series!


Saturday, July 7, 2012

Picnic Series- Installation 2

Post By: Guest Blogger, Kiersten Washle

The last picnic post talked about mason jar meals and those little fellows are certainly yummy adorable, but what do you do if the contents of a mason jar just aren't enough to fill you up? This brings us to today's topic--- the side dish.

Robin is to Batman what the side dish is to any meal or picnic, a very important part of the team of course! We have concluded that side dishes are very important, but the side dish itself remains unannounced. After much intense deliberation we decided that the best side dish for a picnic would be a fresh fruit or vegetable.

After packing your meal, grab another mason jar and throw in some fresh fruit, succulent strawberries, sour or sweet apples, firm grapes, or a mixture of them all! Though it may sound cliche to say, the possibilities really are endless.

Never Deal with Apples that Look Like This Again
Since fruit was our recommendation, we have to admit that there can be problems. Problems like, "The Brown Apple Problem"-we have all faced it. Cutting apples can get messy, they are full of sweet, tart juice which unfortunately seems to ooze out as soon as you break the skin.  Due to this, it is great to go ahead and cut them ahead of  time, but then you have to deal with the unappetizing brown color that occurs as the apple oxidizes. This problem seems like impending doom, entirely unavoidable, however, it is avoidable! Fear no more!


Avoiding Brown Apples Tip 1:
Cut your apples into the shape you want, slices or bite sized chunks, and put them in your picnic ready mason jar. The trick to keep them from browning is to pour in a little bit of a lemon lime soda, Sprite or Mountain Dew, into the jar. You only need about a fourth of the jar filled, easy to find in your fridge. This will keep your apples the lovely creamy color of a crisp freshly cut apple.

Avoiding Brown Apples Tip 2:
Cut your apple into slices and then go into your office and grab a rubber band. Now treat the cut apple like a puzzle, put the pieces back together into the shape of the apple. (Picture Left) Place the rubber band around the middle of the apple, this will hold the apple together like it hasn't been cut. Doing this will keep your apple fresh; all you have to do for and easy treat is remove the rubber band.


Friday, July 6, 2012

The Fairness File- Turmeric Face Mask

Post By: Guest Blogger, Kiersten Washle


The Fairness File
#1: Facial Mask with Turmeric Powder

Turmeric Powder and
                the root it comes from
This is the first simply delightful sliver of  Do-It-Yourself beauty posts; the “Fairness File” will return every now and again to show you another one of its chapter’s. Today, as the title suggests, we will be making a Turmeric mask. 


 What is Turmeric?
Turmeric powder comes from the root of the Curcuma plant which is typically found in tropical south Asia. The plant has long been used in Asia countries known for its healing properties. Recently conducted research is confirming these health benefits. Turmeric is proving to be an agent in anti-aging, acne fighting, and hair growth reduction. 


Before proceeding to the recipe, we wanted to share our personal experience. Both Janine and I are fairer skinned. One of us is a natural red head and the other a natural blonde. With that being said, you can imagine our trepidation when we concocted the mask mixture and saw that it was a very vibrant yellow. We knew this was prevalent in India, where the natural skin tones are nothing like our own and we began to wonder if there was a reason that America hadn’t caught on. Cautiously we proceeded, making ourselves the guinea pigs, we thought if anyone was going to be died an unsavory yellow that it should be us. Happily, we can say that our experience was not one destined to become a story told at parties beginning with a blush and the words, “Well this one time….”  Instead our venture was one that turned out quite nicely. The mixture smelled delightful and had a creamy consistency; once it had been applied, let to dry, and then removed, our skin retained its normal pigment. After the mask our skin felt very smooth and soft, with pore size significantly reduced! As if these effects were not rewarding enough, we also mused that our skin had a very natural glow!

Without further adieu, here is our recipe:

Sweet Spice Mask
We found this recipe works best on oily or acne prone skin. 

Ingredients: 
  • 3 Tablespoons Oatmeal Flour
  • 1 Teaspoon Turmeric Powder
  • 2 Teaspoons Organic Honey
  • 3 Tablespoons Milk
Directions:
  1. Mix all of the above ingredients together until well blended.
  2. Check the consistency of your mixture, you want it to be thick enough to stay on your face and thin enough to spread easily. If you feel your mixture is too thick, add a splash of milk. If you feel your mixture is too thin, add a drop of honey. 
  3. Clean your skin and apply the mixture to your face or desired area. You want a nice even layer to cover the skin.
  4. Lay down in a quiet place for 10-20 minutes, long enough for the mask to harden. Be sure to think happy thoughts! :)
  5. Use water to gently wash off the mask. If you like, you can apply a moisturizer to lock everything in. Though we called this a face mask, it works well on all skin so, if you have any trouble spots go ahead and use it there too!
There you have it! Your very own wrinkle stopping. acne fighting, sweetly scented mask! The next do-it-yourself fairness file will be up soon! 


Thursday, July 5, 2012

Why Not Have A Picnic?

Post By: Guest Blogger, Kiersten Washle

Picnic Installation Number 1

        Picnics have been around for quite a while and they aren't going anywhere anytime soon.  Perfect for dates, casual get-togethers, or pure family fun, picnics range anywhere from casual to more romantic. They are a great way to enjoy the outdoors and spend quality time with loved ones. The sun is shining and birds are singing; it is the perfect time to grab a picnic basket and a friend, head to a shady spot and enjoy the afternoon.

Picnics are ideal because they are so simple, honestly the hardest part is deciding what you want to eat! Personally, our favorite picnic food is a yummy mason jar meal. Recently these little meals have come into vogue, applauded for their simplicity, utility, and the fact that they are just so darn adorable! You can put anything you like into a mason jar, just layering the foods you will mix to make your meal. The trick is to put the wet ingredients on the bottom, then you can have salads and pasta that will keep fresh all day. When you are ready to eat just give the jar a little shake mixing all the ingredients. 


Here are two of our favorite mason jar meals:

Salad with Grilled Chicken
First put in the dressing of your choice, add your grilled chicken, then add a layer of spinach. Next put in some shredded lettuce, some mandarin orange slices, perhaps some shredded carrots and top that off with a little more lettuce and spinach. You can also add croutons, sunflower seeds, or sliced almonds, it is all up to you and what you prefer on your salad!

Almost Spaghetti
Take your mason jar and drop in some marinara sauce. Then add your cooked noodles, we enjoy using fun noodles like penne and farfalle, but you can use any variety. Fresh basil leaves sprinkle on top, lastly add your favorite cheese, we recommend fresh mozzarella balls or shaved Parmesan.

With mason jars you don't have to make a meal, you can also bring all the components of a meal in separate jars. By keeping everything separate and refraining from mixing the ingredients until you arrive at your destination, everything stays extra fresh.