Pages

Showing posts with label Recipe. Show all posts

Sunday, July 29, 2012

Fizzy Foot Bath Bombs


I was inspired by www.freshpickedbeauty.com 's recent post for wonderful rose petal bath bombs. I longed to make them, but realizing that I've used our bathtub...thinking...thinking...NEVER, I knew it was a waste of time and ingredients. Yet, the idea lingered; the thought of a tubful of fizzing water filling with fragrance then the soaking of tired skin, aahhh, I just couldn't shake the comforting thought of this. How could I make this work for me? Blink, lightbulb goes off, foot soak!
I do make time for relaxing foot soaks because I can do something with my hands like reading, typing, and if I'm too tired, I could watch a few minutes of television. Seriously, am I the only one out there who doesn't soak in a tub filled with rose petals? Overly dramatic, yes, but we are in the middle of a drought and I would feel so guilty filling the tub because in my mind after the soak comes the slogging of many buckets of water downstairs, through the main door, and out to the landscaping and gardens. I really don't think Fresh Picked Beauty had THAT in mind.
I played around in the kitchen with this idea and came up with Peppermint-Tea Tree Fizzy Foot Bath Bombs. They smell wonderful and the "test" bomb was delightful leaving my feet pleasantly scented and soft to the touch. The only caveat: do not over spray them because it will activate the fizzing action. 10 spritzs  is all you need. Maybe 11 if your environment is really dry.
Enjoy them! And, leave me a comment to let me know you liked this post.

Peppermint-Tea Tree Fizzy Foot Bath Bombs
Makes: depends on the mold that you use

Ingredients
200 grams Baking Soda (plain old grocery store brand is what you're looking for)
100 grams Citric Acid (you can Fruit Fresh anti-browning fruit powder from the grocery)
5 grams crushed dried mint leaves
5 grams Sweet Almond Oil (use olive oil in a pinch)
15 drops Peppermint Essential Oil
15 drops Tea Tree Essential Oil
Water in a spray bottle 

Preparation:

Mix together the dry ingredients.
Stir in oils.
Spritz then use your hands to mix in the water.
Quickly press into molds. If you don't have a suitable mold, just make patties or blobs of the mixture.
Use parchment paper underneath while waiting 24 hours for them to dry! I found that any other surface caused them to stick.
Fill a tub or bucket that can contain both feet with warm water and drop in two bombs. Let the relaxing begin!


Just a few ingredients

Crushed mint, baking soda, citric acid, essential oils, and almond oil about to be mixed.

spray bottle of scented (plain works) water, ice cube tray too.


Peppermint-Tea Tree Fizzy Foot Bath Bombs!

Saturday, July 14, 2012

Saturday's Super-Food Supper

Post By: Guest Blogger, Kiersten Washle


In an effort to utilize alliteration, we thought Saturday would be a positively perfect opportunity to feature food that is beneficial to the body! Below you will find 4 recipes, together they make a tasty table spread! Not only is everything incredibly tasty, but each dish also features a "super-food." Super foods are foods that offer notable amounts of important vitamins and minerals. 
The recipes are below, but first, a little more info about our featured super-foods:


Carrots:  

  • Full of Carotene, which the body converts to Vitamin A. 
  • Excellent source of the Vitamins B & C
  • Great for your hair and eyes 
  • Full of fiber, benefiting the digestive system

Extra Virgin Olive Oil:


  • Contains the antioxidant Vitamin E
  • Data indicates olive oil consumption is good for maintaining healthy levels of cholesterol
  • Has mild Laxative properties
  • Helps build a balance between the Omega-3 and Omega-6 fats


Quinoa:

  • Contains high concentrations of two flavonoids- quercetin and kaempferol
  • Contains anti-inflammatory agents
  • Provides more then half your daily value of Manganese
  • Full of protein-great for Vegetarians who need to intake protein in the absence of meat

Dark-Chocolate: 

  • Studies suggest that eating dark chocolate in moderate amounts is good for cardiovascular health
  • Brimming with natural antioxidants-good for your immune system
  • It is delicious!


Beta-Salad 2.0
 Ingredients:

  • 2 cups Grated Carrots
  • 1/2 cup Almond Slices
  • 1 cup Parsley
  • Lettuce Cups


Directions:
Grate carrots and add to a bowl. Add your almond slices and parsley. Stir together and serve in lettuce cups. Serve with pomegranate dressing (recipe below) for best flavor.  


Pomegranate Dressing:
Ingredients:

  • 1/4 Cup Pom Juice
  • 1/4 TSP Salt
  • 1/4 TSP Pepper
  • 2 TBSP Extra Virgin Olive Oil
  • 1 TSP Honey


Directions:
Whisk ingredients together in a small bowl, serve on Beta-Salad 2.0. 


Quinoa-Veggie Soup
Ingredients:

  • 2 cups cooked Quinoa
  • 4 cups Vegetable Broth
  • 1 1/2 cups Veggie Meatballs
  • 2 cups Tomatoes, peeled, seeded, and chopped
  • 2 TBSP Extra Virgin Olive Oil and a little more for garnish
  • 1/2 cup Sweet Onion
  • 2 cloves minced Garlic
  • 1/4 chopped Basil
  • 1/4 TSP Sea Salt
  • 1/4 TSP Freshly Ground Black Pepper


Directions:
Add the cooked Quinoa, meatballs, and tomatoes to warm vegetable broth. Set aside. Saute your onions, then add to broth. Simmer the mixture for 15 minutes. Remove one cup of broth and vegetables (no meatballs) and puree in a food processor. Add the puree back to the rest of the broth. Stir together well. To serve, divide among four bowls. Top each bowl with basil, dividing equally between the bowls. Drizzle extra virgin olive oil on top for garnish. 


‘Summer Dreams’ Tomato Bread
(Makes two loaves)

Ingredients:

  • 1 cup tomato juice (homemade is what I use)
  • 1 cup water
  • 2-1/2 tsp active dry yeast
  • 1/3 cup honey
  • 1/4 cup vegetable oil or olive oil
  • 1/4 cup thinly sliced scallions
  • 2 TB minced fresh Italian parsley
  • 1 TB minced fresh rosemary
  • 1 TB fennel seed or sesame seed
  • 1 clove garlic, pressed
  • 1 tsp salt
  • 5-1/2 cups flour, divided
Directions:

In small saucepan, combine tomato juice and water. Cook over low heat to 105-115°F. Pour into large warm mixing bowl and add yeast; stir until dissolved. Add honey, oil, scallions, parsley, rosemary, fennel, garlic and salt; mix well. Add 1 cup flour and stir until smooth. Stir in more flour until a firm dough is formed. Knead on a lightly floured surface about 5 minutes. Shape into a ball and place in a large greased bowl; turn to grease all sides. Cover bowl and set in a warm place to rise for 1 hour or until doubled in size. Punch dough down and divide into 2 equal parts. Shape each piece into a loaf and place in a greased 9x5x3-inch loaf pan. Cover and let rise in a warm place about 1 hour or until doubled in size. Bake at 400°F about 30 minutes or until loaves have a hollow sound when tapped and crust is brown. Remove from pans and cool on wire rack.

Dark-Chocolate Fudge
(Recipe from "The Home-Made Sweet Shop")
Ingredients:
  • 4 cups Superfine Sugar
  • 1 cup whole milk
  • 6 TBSP Unsalted Butter, cut into small pieces, plus extra for greasing
  • 12 oz. Dark Chocolate, cut into small pieces
  • 1 TSP Vanilla Extract. 


Directions:
Grease a 8x12in baking tin and line with baking parchment paper. Prepare and ice bath water. 
Put the sugar, milk and butter in a large heavy pan and cook over a moderate heat, stirring constantly, until the sugar dissolves. 
When the sugar dissolves and the butter is melted, stop stirring. Bring mixture to a boil. 
Without stirring, let the mixture cook at a slow rolling boil for about 10 minutes, or until it reaches 238 degrees Fahrenheit. Stir in the chocolate.
Immediately place the pan over the ice water bath for a few seconds. Stir in the vanilla extract. Pour into tin. Leave to cool. 
Lift out of the tin by the sides of the parchment paper and place on a chopping board. Cut into squares and serve. Store in airtight container. 


Wednesday, July 11, 2012

Picnic Series- Installation 4

Post By: Guest Blogger, Kiersten Washle


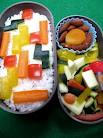
Meet the Bento Box-
This is the Japanese version of a lunch box. Bento roughly translated means "convenience", and what is more perfect for a picnic than something convenient? Typically Bento Boxes are compartmentalized so that you have several small portions of different types of food. In many Japanese households the homemaker spends time each morning to prepare their spouse  and children special Bento lunches.

How does this relate to picnics? Well, Bento boxes were too neat not to mention. Instead of the mason jar mentioned in the first installation, try mixing it up and using a Bento Box. You can use the box, but still stick to American cuisine, or you can use the Box to get inspired. There are plenty of ways to make picnic food in a Bento Box. This is another neat little way to spice up a picnic. If you are feeling especially creative you can try creating little pictures with your food! (Whoever said it is impolite to play with your food was right but, hey! This is a picnic! Have at it!) We are going to share our favorite Japanese inspired picnic item-Sandwich Sushi, followed by some really neat pictures of Bento Boxes whose makers were clearly inspired!


Sandwich Sushi Recipe:
Chicken, Cheese, & Carrot on Wheat


Ingredients:
2 Slices Wheat Bread
Thinly Sliced Chicken Lunch Meat
A Few Carrots, Grated
A Pinch of Shredded Cheese

A knife, Cutting board, and Rolling Pin are also helpful to produce optimal results.

Directions:
1. Take your two slices of bread and cut off the crust (It doesn't flatten out nicely.) Once the crust is cut the lay one end of one of the slices on top of the other end, they should over lap only about 1/2 and inch. With the bread touching, use the rolling pin to roll each piece really flat. The part that was touching should have stuck together leaving you with one long piece of bread.
2. Now layer in your lunch meat and carrots, when you lay them on the bread leave a 1/2 inch border around the perimeter. This will allow the bread to stick when you roll it up.
3. Take your bread, chicken, and carrots and roll it into a cylinder, you should have a long thin roll, pinch the bread together at the seam.
4. Now cut the roll into thirds, you are done! A Japanese cuisine inspired sandwich!

Here are some Bento Boxes for inspiration, these would not only spice up a picnic but also entertain the children and the child in us all!


Monday, July 9, 2012

Picnic Series- Installation 3

Post By: Guest Blogger, Kiersten Washle

At the farm we believe that you are what you eat, so why not enjoy a healthy treat? This is the third installation of the picnic series and the topic for today is finger food. Finger food is one of the greatest parts of picnicking, no silverware, no mess, no worries. As great as finger food is, there is one problem: often times people think their only finger food options are of the packaged and processed variety. Today we want to showcase some options that are both simple, bite-sized, and healthy.

Recipe 1: Grape Caterpillars
 Ingredients:

  • A Package of Grapes
  • Cooking Icing (Betty Crocker brand comes with a easy to squeeze package) 
  • A few mini Chocolate Chips
  • Skewers

 Directions:
1. Wash your grapes. Push about ten grapes onto each skewer.
2. Take your icing and make two circles (as large as you can make them) on the first grape in the line.
3. With 2 mini chocolate chips, make eyes by placing one chip in the center of each icing circle.


Recipe 2: Stuffed Cherry Tomato Poppers
 Ingredients: 

  • Cherry Tomatoes
  • Prepare Salad of Your Choosing
  • Mellon Baller (for scooping out the seeds and pulp)


 Directions:
1. Slice top off of cherry tomato. Scoop out the inside of the cherry tomato using the melon baller. Lightly salt inside an turn upside down on paper towel to drain excess liquid.
2.Stuff with your favorite prepared salad and there you have it! Below are a few prepared item we suggest:

  • Wild rice salad
  • Quinoa
  • Tuna Salad 
  • Orzo Salad


Recipe 3: Fruit in a Lemon 
 Ingredients:

  • 3 Lemons
  • 1 Apple
  • Grapes
  • 1 Orange, peeled
  • A knife
  • A grapefruit knife would be helpful to hollow out the lemon, but as long as it gets hollowed out, you can use whatever works. 

 Directions:
1. Wash your lemon, cut the top off and set aside. (We are going for a container here, so when you cut your lemon do not half it.) Hollow out the lemon. Repeat with the other two lemons.
     ~We won't be using the insides but feel free to use them for a nice refreshing glass of homemade lemonade.
2. Chop a washed apple into small bite sized chunks. Set aside.
3. Wash your grapes and pull them off the stem, set aside.
4. Separate your peeled orange into slices. Set aside.
5. Mix all the fruit together and divide evenly into the lemons.
6. Replace the top of each lemon and use a piece of ribbon, twine, or a rubber band to hold it tight.

Now you have a nice fruit cup! The lemon's natural acidity will keep the fruit fresh and the thick skin will keep it a little cooler than plastic ware.

That's all for today folks! Stay tuned for the next installation of the summer picnic series!


Sunday, July 8, 2012

Did This Come From A Box?

Post By: Guest Blogger, Kiersten Washle

"All you need is water!"
 "Simply Shake and Bake!"
 "Cooks in the bag! No pots necessary!"
 "Ready in Minutes!" 
"Microwaveable Meal!"
As I walk down the aisles of the local grocery, these words call out to me. I glance longingly at the hamburger helper...it would be so easy to give up trying to cook hearty homemade foods and just pick up the box. With so many options out there, cooking from a box just seems so appealing. I mean, "All you need is water!", that sounds great! But, NO! I will stay strong; there is a reason they tell you to think outside the box. The fact of the matter is: Creativity doesn't come in a box.

Today I want to feature a recipe that starts out as a simple dish from a box, but grows into something more original with a few tweaks. After all, one must first have a box in order to think their way out of it!


  Bacon and Ranch Renaissance 
You will need:
-1 box of Suddenly Salad Brand
 Bacon and Ranch Pasta Salad

-2 medium pickles

- 3 or 4 bacon strips, cooked

-1 cup grilled chicken pieces


Directions:
  1. Prepare the Suddenly Salad Pasta Salad as directed on the box.
  2. Take your pickles and cut them into small chunks. (The size is up to you but you don't want them any larger than the pieces of pasta.) Add the pickles into the pasta salad.
  3. Take your bacon and cut this into small pieces as well. Add to the pasta. 
  4. Add the cup of shredded or chunked grilled chicken. 
  5. Stir well and enjoy your plain pasta salad, revitalized!
As a student, I must say this recipe is fantastic. It requires little preparation and provides a new perspective on a boring ole' box recipe! If you want to do this at home as well, impress your parents by simply serving on a lettuce leaf. College chow to cultured cuisine!

Friday, July 6, 2012

The Fairness File- Turmeric Face Mask

Post By: Guest Blogger, Kiersten Washle


The Fairness File
#1: Facial Mask with Turmeric Powder

Turmeric Powder and
                the root it comes from
This is the first simply delightful sliver of  Do-It-Yourself beauty posts; the “Fairness File” will return every now and again to show you another one of its chapter’s. Today, as the title suggests, we will be making a Turmeric mask. 


 What is Turmeric?
Turmeric powder comes from the root of the Curcuma plant which is typically found in tropical south Asia. The plant has long been used in Asia countries known for its healing properties. Recently conducted research is confirming these health benefits. Turmeric is proving to be an agent in anti-aging, acne fighting, and hair growth reduction. 


Before proceeding to the recipe, we wanted to share our personal experience. Both Janine and I are fairer skinned. One of us is a natural red head and the other a natural blonde. With that being said, you can imagine our trepidation when we concocted the mask mixture and saw that it was a very vibrant yellow. We knew this was prevalent in India, where the natural skin tones are nothing like our own and we began to wonder if there was a reason that America hadn’t caught on. Cautiously we proceeded, making ourselves the guinea pigs, we thought if anyone was going to be died an unsavory yellow that it should be us. Happily, we can say that our experience was not one destined to become a story told at parties beginning with a blush and the words, “Well this one time….”  Instead our venture was one that turned out quite nicely. The mixture smelled delightful and had a creamy consistency; once it had been applied, let to dry, and then removed, our skin retained its normal pigment. After the mask our skin felt very smooth and soft, with pore size significantly reduced! As if these effects were not rewarding enough, we also mused that our skin had a very natural glow!

Without further adieu, here is our recipe:

Sweet Spice Mask
We found this recipe works best on oily or acne prone skin. 

Ingredients: 
  • 3 Tablespoons Oatmeal Flour
  • 1 Teaspoon Turmeric Powder
  • 2 Teaspoons Organic Honey
  • 3 Tablespoons Milk
Directions:
  1. Mix all of the above ingredients together until well blended.
  2. Check the consistency of your mixture, you want it to be thick enough to stay on your face and thin enough to spread easily. If you feel your mixture is too thick, add a splash of milk. If you feel your mixture is too thin, add a drop of honey. 
  3. Clean your skin and apply the mixture to your face or desired area. You want a nice even layer to cover the skin.
  4. Lay down in a quiet place for 10-20 minutes, long enough for the mask to harden. Be sure to think happy thoughts! :)
  5. Use water to gently wash off the mask. If you like, you can apply a moisturizer to lock everything in. Though we called this a face mask, it works well on all skin so, if you have any trouble spots go ahead and use it there too!
There you have it! Your very own wrinkle stopping. acne fighting, sweetly scented mask! The next do-it-yourself fairness file will be up soon! 


Thursday, June 28, 2012

DIY Summer Fun: Bird Seed Hearts

By: Guest Blogger, Kiersten Washle

Everyone loves the company of a few coo-coo birds, and no, we are not talking about your in laws, we mean actual birds! The beautiful kind that fly around and chirp happy tunes. In honor of our feathered friends CloverFields would like to present this do it yourself project: Make your own bird seed hearts. They look like this:
This way you can give
 the birds a little something
 for brightening our days
with their cheerful chatter.


Bird Seed Hearts Directions

Materials Needed:
Nonstick spray
Here are some of our supplies
Heart-shaped cookie cutter (any shape of your choice will do)
Skewer or Straw
Cardstock
Twine
Bird Seed hearts made with the below recipe:

Recipe:
(Found online- Make 12 2” hearts)
4 cups Bird seed
¾ cup Flour
3 tsp. Corn Syrup
½ cup water
1 envelope unflavored gelatin

            Mix all the above ingredients together in a large bowl.
Spray the inside of the cookie cutter with nonstick spray.
Place cookie cutter on a parchment lined cookie sheet. Spoon the mixture into the cookie cutter, pressing mixture down firmly with a metal spoon. (The more you press the more solid the shape will be)
Use the chopstick, straw, or skewer to make a hole at the top of the heart, remove chopstick. Gently pull the cookie cutter away.
            Re-spray the cookie cutter and repeat the above steps.
            Let the hearts dry 6-8 hours.
Almost Done! 


When you are done you have these adorable little bird seed hearts perfect for gifts, or for your own enjoyment. With a little piece of twine they make a lovely addition to any tree!