Pages

Sunday, July 29, 2012

Fizzy Foot Bath Bombs


I was inspired by www.freshpickedbeauty.com 's recent post for wonderful rose petal bath bombs. I longed to make them, but realizing that I've used our bathtub...thinking...thinking...NEVER, I knew it was a waste of time and ingredients. Yet, the idea lingered; the thought of a tubful of fizzing water filling with fragrance then the soaking of tired skin, aahhh, I just couldn't shake the comforting thought of this. How could I make this work for me? Blink, lightbulb goes off, foot soak!
I do make time for relaxing foot soaks because I can do something with my hands like reading, typing, and if I'm too tired, I could watch a few minutes of television. Seriously, am I the only one out there who doesn't soak in a tub filled with rose petals? Overly dramatic, yes, but we are in the middle of a drought and I would feel so guilty filling the tub because in my mind after the soak comes the slogging of many buckets of water downstairs, through the main door, and out to the landscaping and gardens. I really don't think Fresh Picked Beauty had THAT in mind.
I played around in the kitchen with this idea and came up with Peppermint-Tea Tree Fizzy Foot Bath Bombs. They smell wonderful and the "test" bomb was delightful leaving my feet pleasantly scented and soft to the touch. The only caveat: do not over spray them because it will activate the fizzing action. 10 spritzs  is all you need. Maybe 11 if your environment is really dry.
Enjoy them! And, leave me a comment to let me know you liked this post.

Peppermint-Tea Tree Fizzy Foot Bath Bombs
Makes: depends on the mold that you use

Ingredients
200 grams Baking Soda (plain old grocery store brand is what you're looking for)
100 grams Citric Acid (you can Fruit Fresh anti-browning fruit powder from the grocery)
5 grams crushed dried mint leaves
5 grams Sweet Almond Oil (use olive oil in a pinch)
15 drops Peppermint Essential Oil
15 drops Tea Tree Essential Oil
Water in a spray bottle 

Preparation:

Mix together the dry ingredients.
Stir in oils.
Spritz then use your hands to mix in the water.
Quickly press into molds. If you don't have a suitable mold, just make patties or blobs of the mixture.
Use parchment paper underneath while waiting 24 hours for them to dry! I found that any other surface caused them to stick.
Fill a tub or bucket that can contain both feet with warm water and drop in two bombs. Let the relaxing begin!


Just a few ingredients

Crushed mint, baking soda, citric acid, essential oils, and almond oil about to be mixed.

spray bottle of scented (plain works) water, ice cube tray too.


Peppermint-Tea Tree Fizzy Foot Bath Bombs!

Sunday, July 22, 2012

Fancy No-Bake Cookies and Loving School Lunch

As a child,  Mom's meals reflected what she knew, German food. She was a wonderful cook baking German tortes and breads, simmering red cabbage with apples and cloves, frying dinnerplate-size schnitzel, making sauces; ..."gravy is for people who can't make sauce", one of her many verbal culinary jabs at southernisms she didn't quite understand. All delicious but not the dishes our neighbors were eating.


It was the elementary school cafeteria that gave me my first tastes of American food, greens & vinegar, fried bologna (cowboy hats) and mashed potatoes, meatloaf doused in a ketchup topping, ruby-red stewed tomatoes, and no-bake cookies. So delicious were the smells coming from the Falls Mills Elementary cafeteria that it was difficult to concentrate on schoolwork and as lunch period approached, the smells became more distinct. It was easy to pick out the pungent smell of mixed greens, the ketchup-y topping of meatloaf, and hamburgers had a smell all their own. But it was the no-bake cookie that had my heart.


Ah, the no-bake cookie. It wasn't until adulthood that I discovered the recipe for this childhood treat. Because I had no background for making it, I admit, I messed it up several times. It requires candy making skill and we didn't make candy at home. 


Recently, having a hankering for no-bake cookies caused me to do what I do best, fiddle with the recipe. And fiddle I did until I conjured up:  Fancy No-Bake Cookies. Notice, only three ingredients, easy...and fancy.


Fancy No-Bake Cookies

Makes: One 8" x 8" dish


From L to R: Prepared ganache, natural peanut butter, oats


Ingredients:
2 cups ganache, recipe follows
1 cup commercially prepared peanut butter (Jif) OR
1/2 cup natural peanut butter
3 cups 1 minute oats


Preparation:
Put ganache, and peanut butter in a medium saucepan over medium high heat. Stirring constantly, mix the two ingredients until thoroughly warmed and combined. Remove from heat.
Stir in oats. Immediately spread in a buttered 8" x 8" glass dish. Refrigerate about 2 hours until set.


TIP: After stirring in oats, drop cookies onto a parchment-lined baking sheet by spoonfuls. Warm as needed in order to drop the entire batch.
Natural peanut butter makes the cookies softer than commercially prepared peanut butter. Knowing this, add more as you like. 
Lastly, these aren't as sweet as the classic, so you may add 1/2 to 1 cup powdered sugar while melting the ganache and peanut butter together PLUS a 1/4 cup of heavy cream to smooth it out.


Ganache:


1 cup milk chocolate chips
1 cup heavy cream


Preparation:
Melt chips in a double boiler. Warm heavy cream in a separate saucepan. When chips are melted, slowly stir in cream. Cool at room temperature. Use as desired.


Sunday, July 15, 2012

Picnic Series-The Last Leg, Installation 6

Post By: Guest Blogger, Kiersten Washle

        
          Who likes doing dishes? A show of hands? Though I cannot actually see you, reader, I am 99% positive you are not sitting at your computer raising your hand. I have literally only met two people in my life who like to do dishes, point being, when it comes to parties, no one volunteers to use their personal   cutlery and dinnerware. Why? Because no one in their right mind wants to throw a party, cook food and clean house in preparation for guests only to have to wash all those dishes as soon as the guests leave. Dishes for 20 could take more time than most are willing to spend. Thank goodness we live in a modern society, right? There is this fantastic new invention called disposable plastic ware! Go ahead, "oooh" and "ahhh", take it in. Now stop. I hope it was clear that the three previous statements were meant to be delivered with the utmost sarcasm.
         Of the aforementioned facts, a few of them do ring true- 1. No one enjoys dish washing, 2. We live in a modern society with lots of convenient tools available, 3. Plastic-ware does exist.
         Really though, it is time to get with the program, there is a way to avoid dishes without utilizing plastic whose destiny is to end up on a landfill. Your items need not be plastic, there is yet another option.  Along with the advent of plastic dining ware came another, a dining ware that was biodegradable. This is clearly the better option; it is readily available online and is about as inexpensive as the other options. Few people are aware of the the fact that biodegradable forks, knives, spoons and plates, bowls, and even cups are all out on the market. With either product, you can still escape the monotony of dish washing...
         This is the last segment about picnicking so we just thought we would end by reminding you that there are environmental options out there for almost everything you do. Please go out and enjoy your summer but do not forget that your choices have long term effect, making the environmentally friendly choice is not only good for you, it is good for the generations to come.

Here are links to websites where the products mentioned above are available:

Saturday, July 14, 2012

Saturday's Super-Food Supper

Post By: Guest Blogger, Kiersten Washle


In an effort to utilize alliteration, we thought Saturday would be a positively perfect opportunity to feature food that is beneficial to the body! Below you will find 4 recipes, together they make a tasty table spread! Not only is everything incredibly tasty, but each dish also features a "super-food." Super foods are foods that offer notable amounts of important vitamins and minerals. 
The recipes are below, but first, a little more info about our featured super-foods:


Carrots:  

  • Full of Carotene, which the body converts to Vitamin A. 
  • Excellent source of the Vitamins B & C
  • Great for your hair and eyes 
  • Full of fiber, benefiting the digestive system

Extra Virgin Olive Oil:


  • Contains the antioxidant Vitamin E
  • Data indicates olive oil consumption is good for maintaining healthy levels of cholesterol
  • Has mild Laxative properties
  • Helps build a balance between the Omega-3 and Omega-6 fats


Quinoa:

  • Contains high concentrations of two flavonoids- quercetin and kaempferol
  • Contains anti-inflammatory agents
  • Provides more then half your daily value of Manganese
  • Full of protein-great for Vegetarians who need to intake protein in the absence of meat

Dark-Chocolate: 

  • Studies suggest that eating dark chocolate in moderate amounts is good for cardiovascular health
  • Brimming with natural antioxidants-good for your immune system
  • It is delicious!


Beta-Salad 2.0
 Ingredients:

  • 2 cups Grated Carrots
  • 1/2 cup Almond Slices
  • 1 cup Parsley
  • Lettuce Cups


Directions:
Grate carrots and add to a bowl. Add your almond slices and parsley. Stir together and serve in lettuce cups. Serve with pomegranate dressing (recipe below) for best flavor.  


Pomegranate Dressing:
Ingredients:

  • 1/4 Cup Pom Juice
  • 1/4 TSP Salt
  • 1/4 TSP Pepper
  • 2 TBSP Extra Virgin Olive Oil
  • 1 TSP Honey


Directions:
Whisk ingredients together in a small bowl, serve on Beta-Salad 2.0. 


Quinoa-Veggie Soup
Ingredients:

  • 2 cups cooked Quinoa
  • 4 cups Vegetable Broth
  • 1 1/2 cups Veggie Meatballs
  • 2 cups Tomatoes, peeled, seeded, and chopped
  • 2 TBSP Extra Virgin Olive Oil and a little more for garnish
  • 1/2 cup Sweet Onion
  • 2 cloves minced Garlic
  • 1/4 chopped Basil
  • 1/4 TSP Sea Salt
  • 1/4 TSP Freshly Ground Black Pepper


Directions:
Add the cooked Quinoa, meatballs, and tomatoes to warm vegetable broth. Set aside. Saute your onions, then add to broth. Simmer the mixture for 15 minutes. Remove one cup of broth and vegetables (no meatballs) and puree in a food processor. Add the puree back to the rest of the broth. Stir together well. To serve, divide among four bowls. Top each bowl with basil, dividing equally between the bowls. Drizzle extra virgin olive oil on top for garnish. 


‘Summer Dreams’ Tomato Bread
(Makes two loaves)

Ingredients:

  • 1 cup tomato juice (homemade is what I use)
  • 1 cup water
  • 2-1/2 tsp active dry yeast
  • 1/3 cup honey
  • 1/4 cup vegetable oil or olive oil
  • 1/4 cup thinly sliced scallions
  • 2 TB minced fresh Italian parsley
  • 1 TB minced fresh rosemary
  • 1 TB fennel seed or sesame seed
  • 1 clove garlic, pressed
  • 1 tsp salt
  • 5-1/2 cups flour, divided
Directions:

In small saucepan, combine tomato juice and water. Cook over low heat to 105-115°F. Pour into large warm mixing bowl and add yeast; stir until dissolved. Add honey, oil, scallions, parsley, rosemary, fennel, garlic and salt; mix well. Add 1 cup flour and stir until smooth. Stir in more flour until a firm dough is formed. Knead on a lightly floured surface about 5 minutes. Shape into a ball and place in a large greased bowl; turn to grease all sides. Cover bowl and set in a warm place to rise for 1 hour or until doubled in size. Punch dough down and divide into 2 equal parts. Shape each piece into a loaf and place in a greased 9x5x3-inch loaf pan. Cover and let rise in a warm place about 1 hour or until doubled in size. Bake at 400°F about 30 minutes or until loaves have a hollow sound when tapped and crust is brown. Remove from pans and cool on wire rack.

Dark-Chocolate Fudge
(Recipe from "The Home-Made Sweet Shop")
Ingredients:
  • 4 cups Superfine Sugar
  • 1 cup whole milk
  • 6 TBSP Unsalted Butter, cut into small pieces, plus extra for greasing
  • 12 oz. Dark Chocolate, cut into small pieces
  • 1 TSP Vanilla Extract. 


Directions:
Grease a 8x12in baking tin and line with baking parchment paper. Prepare and ice bath water. 
Put the sugar, milk and butter in a large heavy pan and cook over a moderate heat, stirring constantly, until the sugar dissolves. 
When the sugar dissolves and the butter is melted, stop stirring. Bring mixture to a boil. 
Without stirring, let the mixture cook at a slow rolling boil for about 10 minutes, or until it reaches 238 degrees Fahrenheit. Stir in the chocolate.
Immediately place the pan over the ice water bath for a few seconds. Stir in the vanilla extract. Pour into tin. Leave to cool. 
Lift out of the tin by the sides of the parchment paper and place on a chopping board. Cut into squares and serve. Store in airtight container. 


Friday, July 13, 2012

Picnic Series- Installation 5

Post By: Guest Blogger, Kiersten Washle

A Piece-It-Together Picnic!


When you want to picnic but you don't want to go out and get all the necessary food, it is time for a piece-it-together picnic. The idea is similar to that of a church luncheon; everyone brings a dish they enjoy or have on hand. All you have to do is call a few friends, just decide a time and place. Then you all show up with one edible item. By the time you and your group of friends are assembled, you should have quite the nice little array of food. Now enjoy the food, fun, and fellowship as you all dine out amongst nature's beauty! 


Thursday, July 12, 2012

DIY Paper Pockets

Post By: Guest Blogger, Kiersten Washle

Today's post is going to be an instructional post, giving step by step instructions for how to make paper pockets! Simple to make, these pockets can be used for many different purposes. At the bottom there are pictures of what we did with our pockets and extra suggestions for how to use these little cuties! Without further ado, let's get started!

Step 1: Gather supplies!
You will need:

  • Paper
  • Scissors
  • Something Round 
  • A sewing machine (or a needle and thread)
  • Candy 
  • Markers or Stickers for decorating! 


Step 2: Take your round object and trace a circle onto your paper.
We used the bottom of a candle stick.


Step 3: Once you have one circle, cut it out and use it as a stencil. We took out first paper circle and traced as many circles as we could on our scrap piece of craft paper. You can use any paper you like, but remember, in an effort to be eco-friendly always try and maximize the space on one sheet of paper.
This was our piece of paper, we started tracing...

...and ended up with this. There are enough circles
here to make thirteen paper pockets.


Step 4: Cut all your circles out!

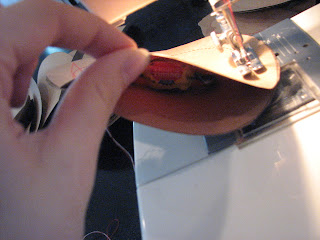
Step 5: Grab your sewing machine and get ready to sew paper. To do this, take two of your circles and lay them on top of each other. Place them how you would normally place a piece of fabric. (Pictured below)
This is how your paper circles should look before you sew.

Hold your paper circles and begin to sew.
Sew halfway around the circle and then stop. 

Grab some candy; this is what we stuffed into our paper pockets.

Use your finger to push in each piece of candy. Don't put too
much inside or you will have a difficult time trying to close it up.
Your candy should be inside and pushed back as far as possible.
This is what the stuffed pocket will look like. Now it is time
to finish sewing the pocket closed. To do this, pinch the paper
together and continue to sew the perimeter.
Once you have sewn around the entire circle cut the strings.
You need to pull all the loose strings to the back of your pocket
and tie a knot. This keeps the stitching from unraveling.
 Cut off the extra string and...
...TADAHH! The completely sewn circle will look like this! 

Step 6: Time to decorate! This is where you can get as creative as you want. You can use markers, stamps, pens, stickers, buttons, tissue paper, or paint! It is up to you!
Below are some of the designs we made using just a few pens.
These would make really cute party favors.
We put a bunch of them in a basket by the door so our guests
could take one as they left, to add excitement we wrote the following little poem:
"Even thought it is time to go,
We just wanted you to know:
Having you was such a treat!
Please take a little something sweet!"

We also thought these little pockets would be a really cute something
to receive in the mail. You could use them as a thank-you card,
a thinking-of-you card, a get well soon card, or just to say hello!

Back to the mail idea, you could reinvent your traditional Christmas
card. Try replacing it with a paper pocket filled with candy canes!
If you want to stick with a plain Christmas card, that doesn't
mean you couldn't break these babies out at another holiday! ;)

These pockets could be used to make someone's day..stash a few in
your desk or purse and when you see someone in need
of a pick-me-up, casually pass them a pocket with an uplifting message!

We really like the idea of making someone's day so really, get
creative! You can say any number of things; say something
sweet or just order someone to "HAVE A GREAT DAY!!"


If ordering someone to have a nice day doesn't float your boat,
try a gentler method- crack a few jokes!
On an entirely different note, try switching out the candy for
a few flower seeds and some soil. If you use biodegradable paper
(most paper is) then you can make a package that can be buried!
That is right, with seeds and soil, this paper pocket is ready to be planted!
Dig a hole and toss it in, later on you can enjoy a few pretty flowers.


 You can use scrap fabric as well as paper, and the decoration possibilities are just about endless. You can put just about anything inside as well.With these pockets, the sky is the limit! 

Wednesday, July 11, 2012

Picnic Series- Installation 4

Post By: Guest Blogger, Kiersten Washle


Meet the Bento Box-
This is the Japanese version of a lunch box. Bento roughly translated means "convenience", and what is more perfect for a picnic than something convenient? Typically Bento Boxes are compartmentalized so that you have several small portions of different types of food. In many Japanese households the homemaker spends time each morning to prepare their spouse  and children special Bento lunches.

How does this relate to picnics? Well, Bento boxes were too neat not to mention. Instead of the mason jar mentioned in the first installation, try mixing it up and using a Bento Box. You can use the box, but still stick to American cuisine, or you can use the Box to get inspired. There are plenty of ways to make picnic food in a Bento Box. This is another neat little way to spice up a picnic. If you are feeling especially creative you can try creating little pictures with your food! (Whoever said it is impolite to play with your food was right but, hey! This is a picnic! Have at it!) We are going to share our favorite Japanese inspired picnic item-Sandwich Sushi, followed by some really neat pictures of Bento Boxes whose makers were clearly inspired!


Sandwich Sushi Recipe:
Chicken, Cheese, & Carrot on Wheat


Ingredients:
2 Slices Wheat Bread
Thinly Sliced Chicken Lunch Meat
A Few Carrots, Grated
A Pinch of Shredded Cheese

A knife, Cutting board, and Rolling Pin are also helpful to produce optimal results.

Directions:
1. Take your two slices of bread and cut off the crust (It doesn't flatten out nicely.) Once the crust is cut the lay one end of one of the slices on top of the other end, they should over lap only about 1/2 and inch. With the bread touching, use the rolling pin to roll each piece really flat. The part that was touching should have stuck together leaving you with one long piece of bread.
2. Now layer in your lunch meat and carrots, when you lay them on the bread leave a 1/2 inch border around the perimeter. This will allow the bread to stick when you roll it up.
3. Take your bread, chicken, and carrots and roll it into a cylinder, you should have a long thin roll, pinch the bread together at the seam.
4. Now cut the roll into thirds, you are done! A Japanese cuisine inspired sandwich!

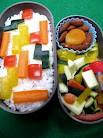
Here are some Bento Boxes for inspiration, these would not only spice up a picnic but also entertain the children and the child in us all!


Monday, July 9, 2012

Picnic Series- Installation 3

Post By: Guest Blogger, Kiersten Washle

At the farm we believe that you are what you eat, so why not enjoy a healthy treat? This is the third installation of the picnic series and the topic for today is finger food. Finger food is one of the greatest parts of picnicking, no silverware, no mess, no worries. As great as finger food is, there is one problem: often times people think their only finger food options are of the packaged and processed variety. Today we want to showcase some options that are both simple, bite-sized, and healthy.

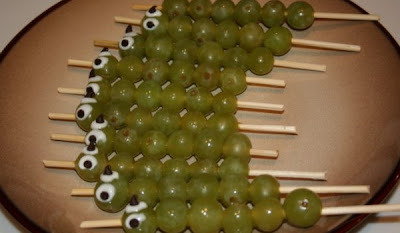
Recipe 1: Grape Caterpillars
 Ingredients:

  • A Package of Grapes
  • Cooking Icing (Betty Crocker brand comes with a easy to squeeze package) 
  • A few mini Chocolate Chips
  • Skewers

 Directions:
1. Wash your grapes. Push about ten grapes onto each skewer.
2. Take your icing and make two circles (as large as you can make them) on the first grape in the line.
3. With 2 mini chocolate chips, make eyes by placing one chip in the center of each icing circle.


Recipe 2: Stuffed Cherry Tomato Poppers
 Ingredients: 

  • Cherry Tomatoes
  • Prepare Salad of Your Choosing
  • Mellon Baller (for scooping out the seeds and pulp)


 Directions:
1. Slice top off of cherry tomato. Scoop out the inside of the cherry tomato using the melon baller. Lightly salt inside an turn upside down on paper towel to drain excess liquid.
2.Stuff with your favorite prepared salad and there you have it! Below are a few prepared item we suggest:

  • Wild rice salad
  • Quinoa
  • Tuna Salad 
  • Orzo Salad


Recipe 3: Fruit in a Lemon 
 Ingredients:

  • 3 Lemons
  • 1 Apple
  • Grapes
  • 1 Orange, peeled
  • A knife
  • A grapefruit knife would be helpful to hollow out the lemon, but as long as it gets hollowed out, you can use whatever works. 

 Directions:
1. Wash your lemon, cut the top off and set aside. (We are going for a container here, so when you cut your lemon do not half it.) Hollow out the lemon. Repeat with the other two lemons.
     ~We won't be using the insides but feel free to use them for a nice refreshing glass of homemade lemonade.
2. Chop a washed apple into small bite sized chunks. Set aside.
3. Wash your grapes and pull them off the stem, set aside.
4. Separate your peeled orange into slices. Set aside.
5. Mix all the fruit together and divide evenly into the lemons.
6. Replace the top of each lemon and use a piece of ribbon, twine, or a rubber band to hold it tight.

Now you have a nice fruit cup! The lemon's natural acidity will keep the fruit fresh and the thick skin will keep it a little cooler than plastic ware.

That's all for today folks! Stay tuned for the next installation of the summer picnic series!


Sunday, July 8, 2012

Did This Come From A Box?

Post By: Guest Blogger, Kiersten Washle

"All you need is water!"
 "Simply Shake and Bake!"
 "Cooks in the bag! No pots necessary!"
 "Ready in Minutes!" 
"Microwaveable Meal!"
As I walk down the aisles of the local grocery, these words call out to me. I glance longingly at the hamburger helper...it would be so easy to give up trying to cook hearty homemade foods and just pick up the box. With so many options out there, cooking from a box just seems so appealing. I mean, "All you need is water!", that sounds great! But, NO! I will stay strong; there is a reason they tell you to think outside the box. The fact of the matter is: Creativity doesn't come in a box.

Today I want to feature a recipe that starts out as a simple dish from a box, but grows into something more original with a few tweaks. After all, one must first have a box in order to think their way out of it!


  Bacon and Ranch Renaissance 
You will need:
-1 box of Suddenly Salad Brand
 Bacon and Ranch Pasta Salad

-2 medium pickles

- 3 or 4 bacon strips, cooked

-1 cup grilled chicken pieces


Directions:
  1. Prepare the Suddenly Salad Pasta Salad as directed on the box.
  2. Take your pickles and cut them into small chunks. (The size is up to you but you don't want them any larger than the pieces of pasta.) Add the pickles into the pasta salad.
  3. Take your bacon and cut this into small pieces as well. Add to the pasta. 
  4. Add the cup of shredded or chunked grilled chicken. 
  5. Stir well and enjoy your plain pasta salad, revitalized!
As a student, I must say this recipe is fantastic. It requires little preparation and provides a new perspective on a boring ole' box recipe! If you want to do this at home as well, impress your parents by simply serving on a lettuce leaf. College chow to cultured cuisine!

Saturday, July 7, 2012

Picnic Series- Installation 2

Post By: Guest Blogger, Kiersten Washle

The last picnic post talked about mason jar meals and those little fellows are certainly yummy adorable, but what do you do if the contents of a mason jar just aren't enough to fill you up? This brings us to today's topic--- the side dish.

Robin is to Batman what the side dish is to any meal or picnic, a very important part of the team of course! We have concluded that side dishes are very important, but the side dish itself remains unannounced. After much intense deliberation we decided that the best side dish for a picnic would be a fresh fruit or vegetable.

After packing your meal, grab another mason jar and throw in some fresh fruit, succulent strawberries, sour or sweet apples, firm grapes, or a mixture of them all! Though it may sound cliche to say, the possibilities really are endless.

Never Deal with Apples that Look Like This Again
Since fruit was our recommendation, we have to admit that there can be problems. Problems like, "The Brown Apple Problem"-we have all faced it. Cutting apples can get messy, they are full of sweet, tart juice which unfortunately seems to ooze out as soon as you break the skin.  Due to this, it is great to go ahead and cut them ahead of  time, but then you have to deal with the unappetizing brown color that occurs as the apple oxidizes. This problem seems like impending doom, entirely unavoidable, however, it is avoidable! Fear no more!


Avoiding Brown Apples Tip 1:
Cut your apples into the shape you want, slices or bite sized chunks, and put them in your picnic ready mason jar. The trick to keep them from browning is to pour in a little bit of a lemon lime soda, Sprite or Mountain Dew, into the jar. You only need about a fourth of the jar filled, easy to find in your fridge. This will keep your apples the lovely creamy color of a crisp freshly cut apple.

Avoiding Brown Apples Tip 2:
Cut your apple into slices and then go into your office and grab a rubber band. Now treat the cut apple like a puzzle, put the pieces back together into the shape of the apple. (Picture Left) Place the rubber band around the middle of the apple, this will hold the apple together like it hasn't been cut. Doing this will keep your apple fresh; all you have to do for and easy treat is remove the rubber band.