Today's post is going to be an instructional post, giving step by step instructions for how to make paper pockets! Simple to make, these pockets can be used for many different purposes. At the bottom there are pictures of what we did with our pockets and extra suggestions for how to use these little cuties! Without further ado, let's get started!
Step 1: Gather supplies!
You will need:
- Paper
- Scissors
- Something Round
- A sewing machine (or a needle and thread)
- Candy
- Markers or Stickers for decorating!


Step 2: Take your round object and trace a circle onto your paper.
 |
| We used the bottom of a candle stick. |

Step 3: Once you have one circle, cut it out and use it as a stencil. We took out first paper circle and traced as many circles as we could on our scrap piece of craft paper. You can use any paper you like, but remember, in an effort to be eco-friendly always try and maximize the space on one sheet of paper.
 |
| This was our piece of paper, we started tracing... |
 |
| ...and ended up with this. There are enough circles here to make thirteen paper pockets. |
Step 5: Grab your sewing machine and get ready to sew paper. To do this, take two of your circles and lay them on top of each other. Place them how you would normally place a piece of fabric. (Pictured below)
 |
| This is how your paper circles should look before you sew. |
 |
| Hold your paper circles and begin to sew. |
 |
| Sew halfway around the circle and then stop. |
 |
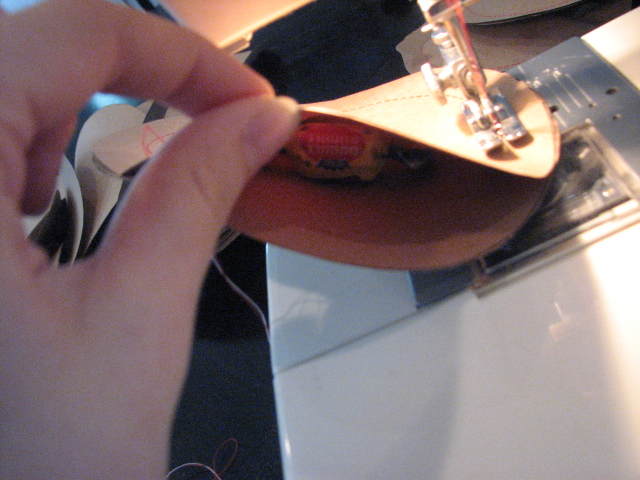
| Grab some candy; this is what we stuffed into our paper pockets. |
 |
| Use your finger to push in each piece of candy. Don't put too much inside or you will have a difficult time trying to close it up. |
 |
| Your candy should be inside and pushed back as far as possible. |
 |
| This is what the stuffed pocket will look like. Now it is time to finish sewing the pocket closed. To do this, pinch the paper together and continue to sew the perimeter. |
 |
| Once you have sewn around the entire circle cut the strings. You need to pull all the loose strings to the back of your pocket and tie a knot. This keeps the stitching from unraveling. Cut off the extra string and... |
 |
| ...TADAHH! The completely sewn circle will look like this! |
Step 6: Time to decorate! This is where you can get as creative as you want. You can use markers, stamps, pens, stickers, buttons, tissue paper, or paint! It is up to you!
Below are some of the designs we made using just a few pens.
 |
| These would make really cute party favors. We put a bunch of them in a basket by the door so our guests could take one as they left, to add excitement we wrote the following little poem: "Even thought it is time to go, We just wanted you to know: Having you was such a treat! Please take a little something sweet!" |
 |
| We also thought these little pockets would be a really cute something to receive in the mail. You could use them as a thank-you card, a thinking-of-you card, a get well soon card, or just to say hello! |
 |
| Back to the mail idea, you could reinvent your traditional Christmas card. Try replacing it with a paper pocket filled with candy canes! If you want to stick with a plain Christmas card, that doesn't mean you couldn't break these babies out at another holiday! ;) |
 |
| These pockets could be used to make someone's day..stash a few in your desk or purse and when you see someone in need of a pick-me-up, casually pass them a pocket with an uplifting message! |
 |
| We really like the idea of making someone's day so really, get creative! You can say any number of things; say something sweet or just order someone to "HAVE A GREAT DAY!!" |
 |
| If ordering someone to have a nice day doesn't float your boat, try a gentler method- crack a few jokes! |
 |
| On an entirely different note, try switching out the candy for a few flower seeds and some soil. If you use biodegradable paper (most paper is) then you can make a package that can be buried! That is right, with seeds and soil, this paper pocket is ready to be planted! Dig a hole and toss it in, later on you can enjoy a few pretty flowers. |
No comments:
Post a Comment